ESP32 unit testing with CLion and googletest
This article is about setting up CLion with googletest to run unit tests in one click locally. This will allow us to have a quicker development cycle as we can run and debug our code locally before flashing the ESP32. In this article we will go over setting up the environment so we can build the app and flash the ESP32.
- Prerequisite Software
- Setting up the ESP32 environment
- Setting up CLion
- Add googletest
- Create Unit Test
- Configure CMake to run googletest
- Run the tests!
- Flashing the ESP32
Prerequisite software
Make sure the following is installed before proceeding
- Clion
- Git
- CH340 USB-SERIAL driver
- This is the driver needed to communicate with the ESP32 on may dev boards. It is a USB to serial device driver. Sparkfun has instructions here
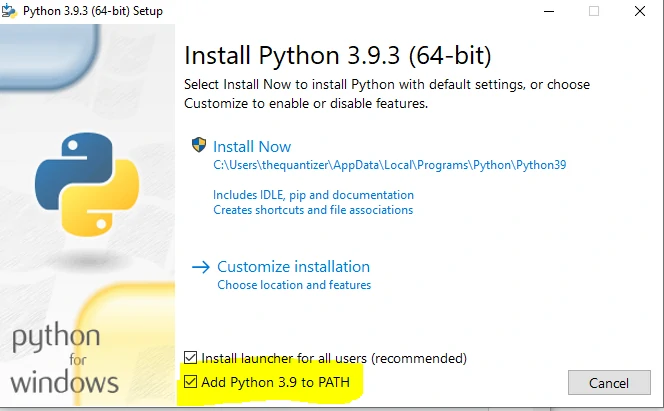
- Python (We used 3.9.3)
- Be sure to add python to the PATH in the install or you will have to manually set this up
- Visual Studio C++ Build Tools
- Need this for when python does wheel builds later in the process

- MinGW
- We need a C and C++ compiler and this one works well. Originally we used Microsoft’s Visual Studio C++ Build Tools but would get occasionally get an error related to MTd mismatch in the multi threading options. So we just used MinGW compilers instead of trying to track down the issue.
- After installing MinGW run MinGWInstaller.exe and add the
- mingw32-base
- mingw32-gcc-g++ package
Setting up the ESP32 environment
- Note: Espressif offers a quick setup that will install all the requirements to a virtual environment. We will not use this method as CLion will need access to some of the information so we will install the dependencies directly to our system.
Get ESP the software
- Make sure you have access to
pythonfrom the terminal. If you cant just executepythonfrom the terminal than you will need to add it to your PATH env var.- Our PATH looks like this after adding the python paths
- As an administrator in powershell run
set-executionpolicy unrestrictedto allow you to execute scripts download from the internet.- Close this powershell terminal. We no longer need admin rights
- Open a new powershell terminal as a normal user
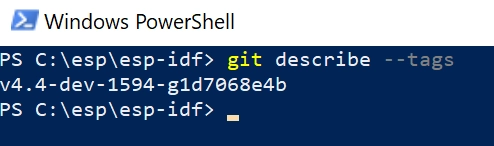
- Clone the esp-idf repository (for use we are cloning into C:\esp).
- At the time of this writing the current release (4.2) does not have the powershell scripts so we will grab the master branch (4.4 dev)
git clone <code>--recursivehttps://github.com/espressif/esp-idf.git
- Verify you are on v4.4-dev
- Install the ESP tools
python C:\esp\esp-idf\tools\idf_tools.py install- This will download and install different parts of the toolchain including the xtensa c and c++ compilers to
%USERPROFILE%\.expressiffor us that isC:\User\thequantizer\.expressif\as well as things like ninja
- This will download and install different parts of the toolchain including the xtensa c and c++ compilers to
- Install the python library dependencies in the esp-idf requirements.txt
pip3.9.exe install -r C:\esp\esp-idf\requirements.txt
- Test the install worked
- setting up the esp environment variables via their export.ps1 script
C:\esp\esp-idf\export.ps1
- setting up the esp environment variables via their export.ps1 script
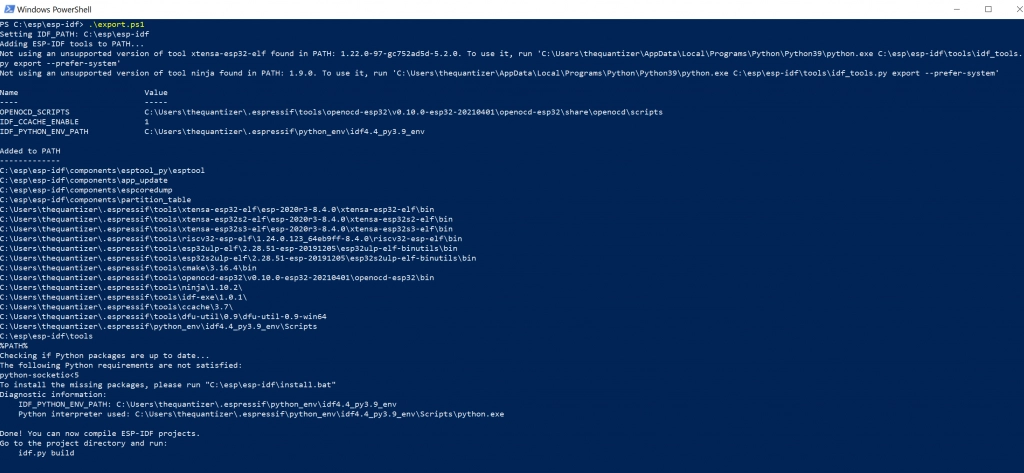
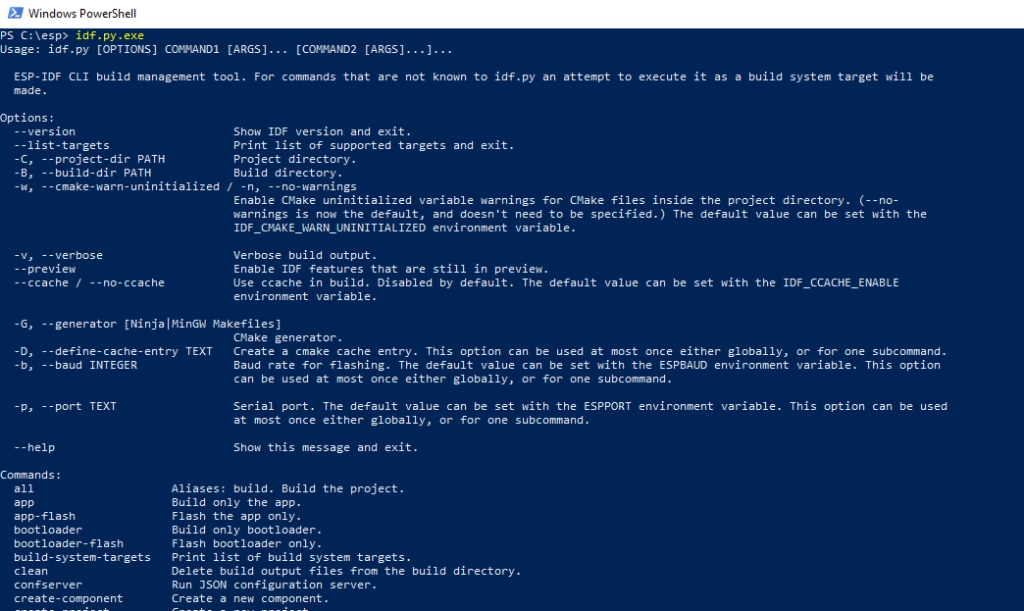
- Next see if the idf command works
idf.py.exe
We were unable to figure out how to change the terminal environment that CLion uses for CMake so we will need to set up our default terminal to be able to run the esp software
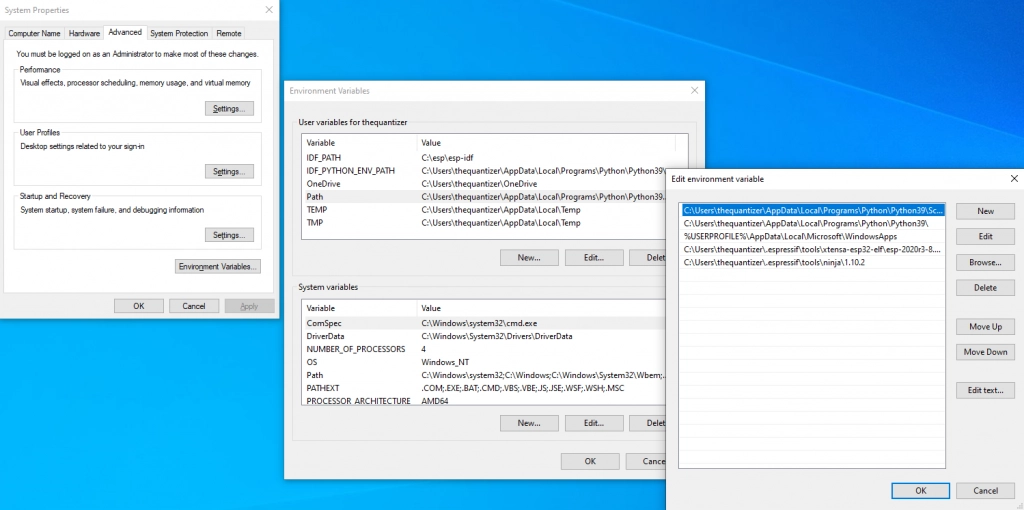
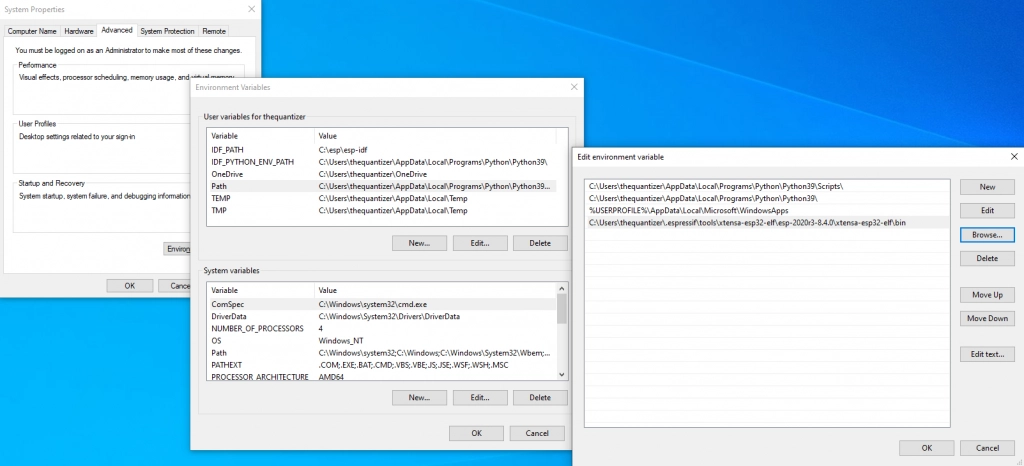
- Set the IDF_PATH
IDF_PATH=C:\esp\esp-idf- The expressif CMake files and python scripts reference this env var
- Set IDF_PYTHON_ENV_PATH to the same directory as your installed python
For us<code>IDF_PYTHON_ENV_PATH= C:\Users\thequantizer\AppData\Local\Programs\Python\Python39</code>- If you do not do this the expressif CMake files will default the python dir to one that may not be the one that we are going to install the required packages in
- Add xtensa compiler bin’s to the PATH env var
C:\Users\thequantizer\esp\.espressif\tools\xtensa-esp32-elf\esp-2020r3-8.4.0\xtensa-esp32-elf\bin- The reason we need to do this step is the CMake build system that expressif created will just look for the executable by just its name. This means if it is not directly available on the terminal than CMake will fail saying it can not find the xtensa C and CPP compilers
- Add ninja to the PATH
C:\Users\thequantizer.espressif\tools\ninja\1.10.2- We will use ninja with CMake
Setup CLion
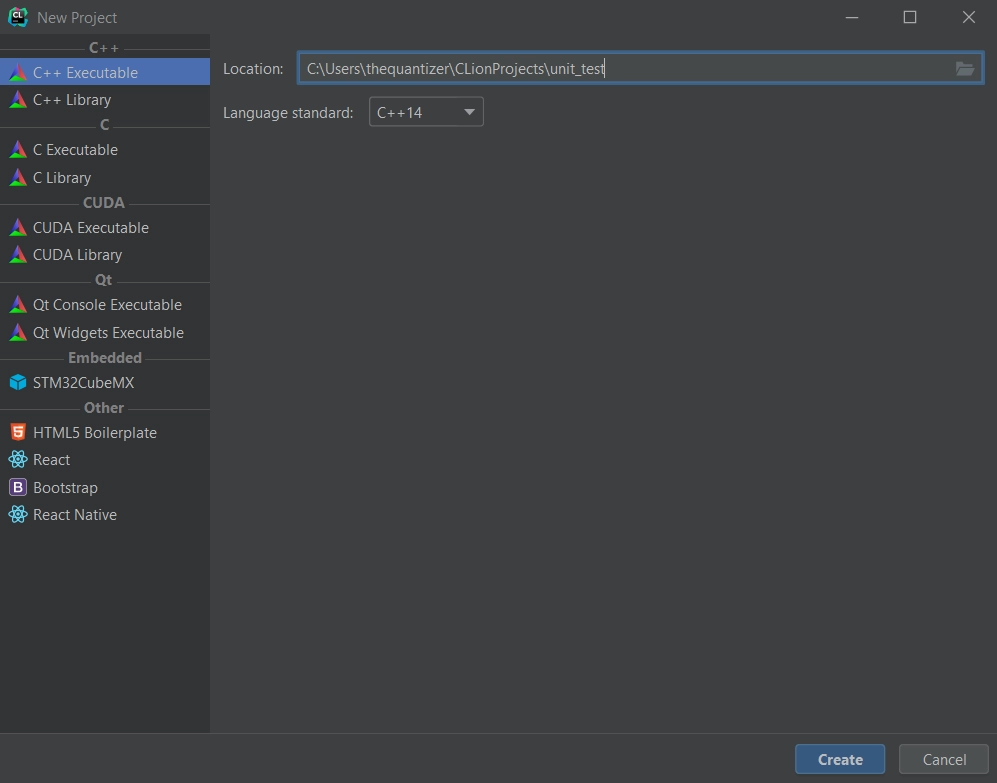
- Create a new
C++ Executablelibrary calledunit_test
- Next, lets setup our CLion default terminal to be the ESP-IDF enabled terminal.
- In
file->settings->tools->terminalset the shell path to the to the power shell executable and with the arguments to run the ESP-IDF’s export.ps1 script. This script will ensure all the prerequisites and environment variable exports are loaded into the powershell instance. I installed my esp instance toC:\codebase\esp-idfso for me the command looks like thisC:\Windows\system32\WindowsPowerShell\v1.0\powershell.exe -NoExit -File "C:\codebase\esp-idf\export.ps1"
- In
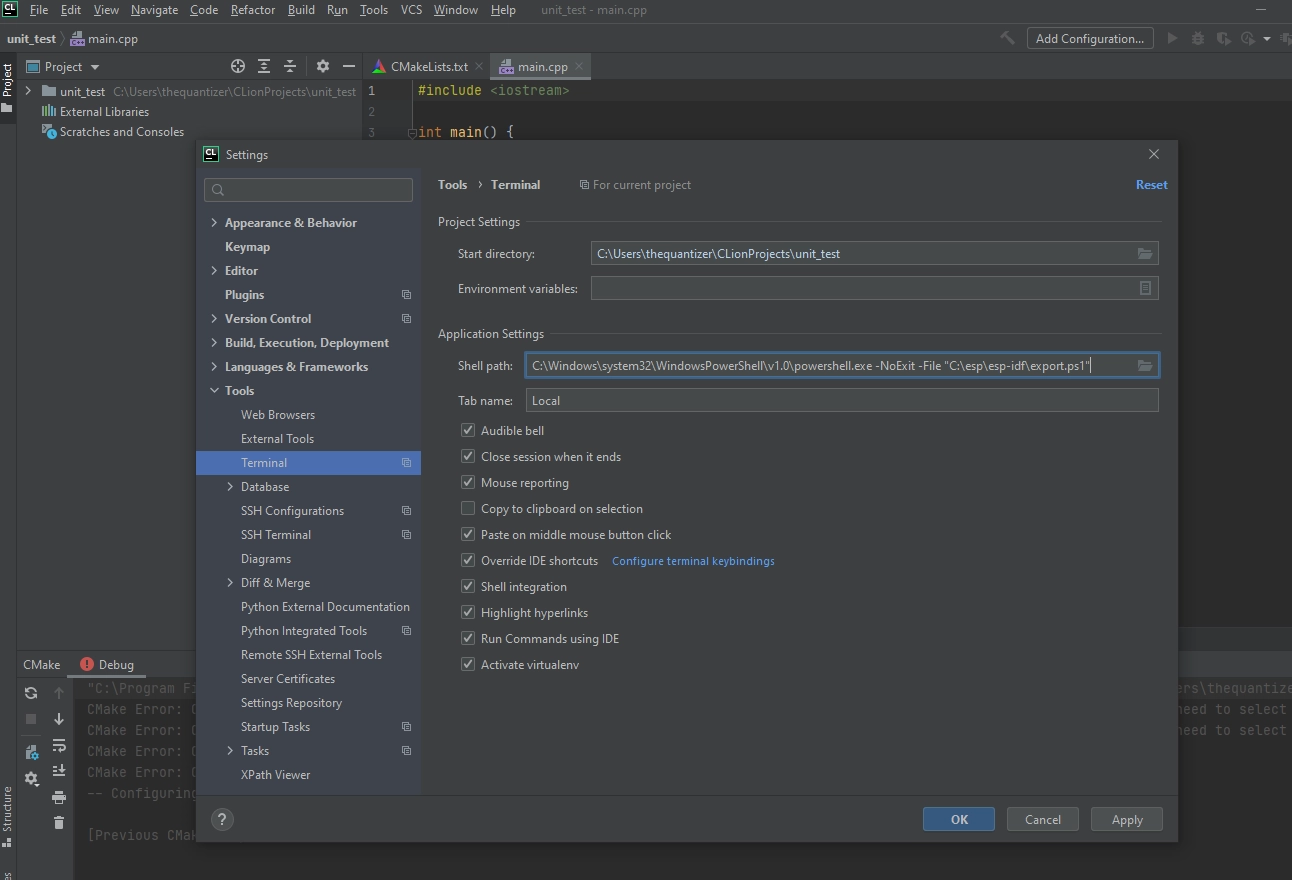
- Now when you open a terminal you should get something that looks like this

Delete the default files and create this file structure
- \main
|–>CmakeList.txt
|–>main.cpp
CMakeList.txt
- \main
CMakeList.txt
- this is the root CMakeList.txt file and includes the project.cmake file from the ESP-IDF. This will load the ESP-IDF CMake build system
\main\CMakeList.txt
- Regesters main.cpp with the ESP-IDF CMake build system
idf_component_register(SRCS "main.cpp"
        INCLUDE_DIRS "")
- \main\main.cpp (Hello world main file)
#include <stdio.h>
#include "sdkconfig.h"
#include "freertos/FreeRTOS.h"
#include "freertos/task.h"
#include "esp_system.h"
#include "esp_spi_flash.h"

extern "C" {
void app_main();
}

void app_main(void)
{
    printf("Hello world!\n");

    /* Print chip information */
    esp_chip_info_t chip_info;
    esp_chip_info(&chip_info);
    printf("This is %s chip with %d CPU cores, WiFi%s%s, ",
           CONFIG_IDF_TARGET,
           chip_info.cores,
           (chip_info.features & CHIP_FEATURE_BT) ? "/BT" : "",
           (chip_info.features & CHIP_FEATURE_BLE) ? "/BLE" : "");

    printf("silicon revision %d, ", chip_info.revision);

    printf("%dMB %s flash\n", spi_flash_get_chip_size() / (1024 * 1024),
           (chip_info.features & CHIP_FEATURE_EMB_FLASH) ? "embedded" : "external");

    printf("Free heap: %d\n", esp_get_free_heap_size());

    for (int i = 10; i >= 0; i--) {
        printf("Restarting in %d seconds...\n", i);
        vTaskDelay(1000 / portTICK_PERIOD_MS);
    }
    printf("Restarting now.\n");
    fflush(stdout);
    esp_restart();
}
- Note: You can reload the CMake project manually via.
Tools -> CMake -> Reload CMake Project
Add googletest
Now we are going to get the [googletest framework v1.10.x][2]
PS C:\Users\thequantizer\CLionProjects\unit_test> mkdir libs
PS C:\Users\thequantizer\CLionProjects\unit_test> cd libs
PS C:\Users\thequantizer\CLionProjects\unit_test\libs> git clone --recursive https://github.com/google/googletest.git
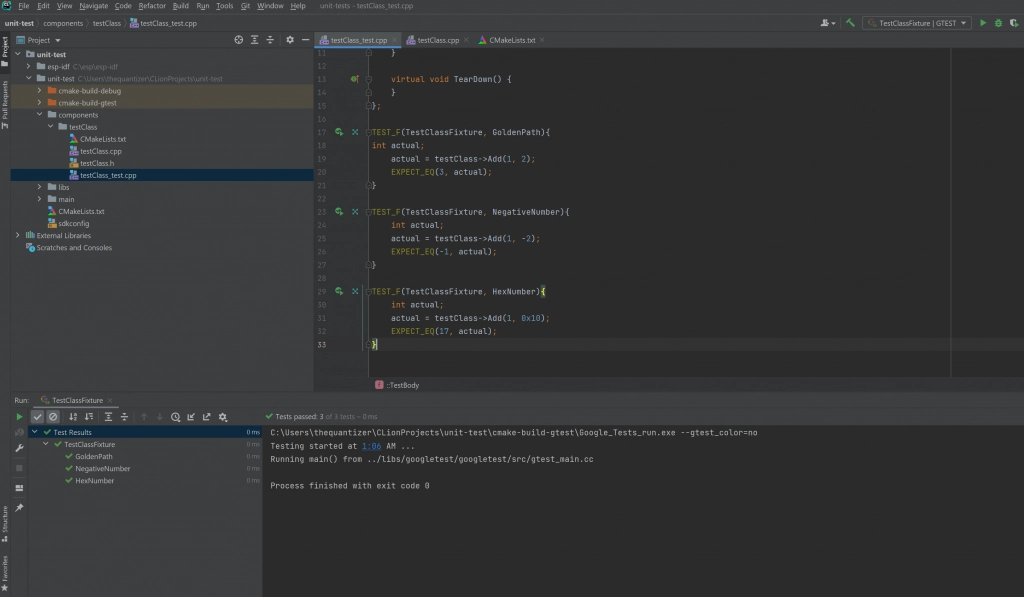
Create Unit Tests
Create a test component files
<project_root>\components\testClass
- testClass.cpp
#include "testClass.h"

int TestClass::Add(int x, int y){
    return x + y;
}
- testClass.h
#ifndef TEST_CLASS_H
#define TEST_CLASS_H

class TestClass {
public:
    TestClass(){}
    int Add(int x, int y);
private:
};

#endif //TEST_CLASS_H
- testClass_test.cpp
#include "testClass.h"
#include "gtest/gtest.h"

class TestClassFixture : public ::testing::Test {
protected:
    TestClass *testClass;

    virtual void SetUp()
    {
        testClass = new TestClass();
    }

    virtual void TearDown() {
    }
};

TEST_F(TestClassFixture, GoldenPath){
int actual;
    actual = testClass->Add(1, 2);
    EXPECT_EQ(3, actual);
}

TEST_F(TestClassFixture, NegativeNumber){
    int actual;
    actual = testClass->Add(1, -2);
    EXPECT_EQ(-1, actual);
}

TEST_F(TestClassFixture, HexNumber){
    int actual;
    actual = testClass->Add(1, 0x10);
    EXPECT_EQ(17, actual);
}
- CMakeList.txt
if(${GTEST})
    project(testClass)

    #Creates an env var for building HEADER_FILES
    set(HEADER_FILES
            testClass.h
            )
    #Creates an env var for building SOURCE_FILES
    set(SOURCE_FILES
            testClass.cpp
            )

    #Adds a library called testClass_lib to be built from the SOURCE_FILES, will be statically linked
    add_library(testClass_lib STATIC ${SOURCE_FILES} ${HEADER_FILES})
else()
    set(SOURCE_FILES
            testClass.cpp
            )

    set(COMPONENT_SRCS "${SOURCE_FILES}")
    set(COMPONENT_ADD_INCLUDEDIRS ".")
    register_component()
endif()
Configure CMake to run googletest
Configure the root CMakeList.txt to have two build paths, the default that will build for the ESP32 and an alternate path that will build locally and run googletest
cmake_minimum_required(VERSION 3.5)

if(${GTEST})
    #Creates a variable named TEST_FILES that can be used via ${TEST_FILES}
    set(TEST_FILES
            components/testClass/testClass_test.cpp
            )
    #Libraries that are needed by the test files
    set(TEST_LIBS
            testClass_lib
            )

    #adds include directories before adding subdirectories so they have access to the header prototypes
    include_directories(components/testClass)

    #tells cmake that there is another CMakeList.txt in components/testClass that it needs to process
    add_subdirectory(components/testClass)
endif()

if(${GTEST})
    project(unit-tests)

    message("running GTEST")
    add_subdirectory(libs/googletest)

    # adds to the include path
    # We have access to the var gtest_SOURCE_DIR because it is being set in the `lib` CMake files that is called above
    # via add_subdirectory(google)
    include_directories(${gtest_SOURCE_DIR}/include ${gtest_SOURCE_DIR})
    include_directories(${gmock_SOURCE_DIR}/include ${gmock_SOURCE_DIR})

    # Creates an executable called Google_Test_run and adds tests from testClass/test/test.cpp
    add_executable(Google_Tests_run ${TEST_FILES})

    # link the project libraries and google test library to the executable Google_Tests_run
    target_link_libraries(Google_Tests_run ${TEST_LIBS} gtest gmock gtest_main)
else()
    message("running default")
    # sets up the project to use the IDF cmake build system
    # This is NOT THE SAME as $ENV{IDF_PATH}/tools/cmake/idf.cmake
    include($ENV{IDF_PATH}/tools/cmake/project.cmake)
    project(unit-test)
endif()
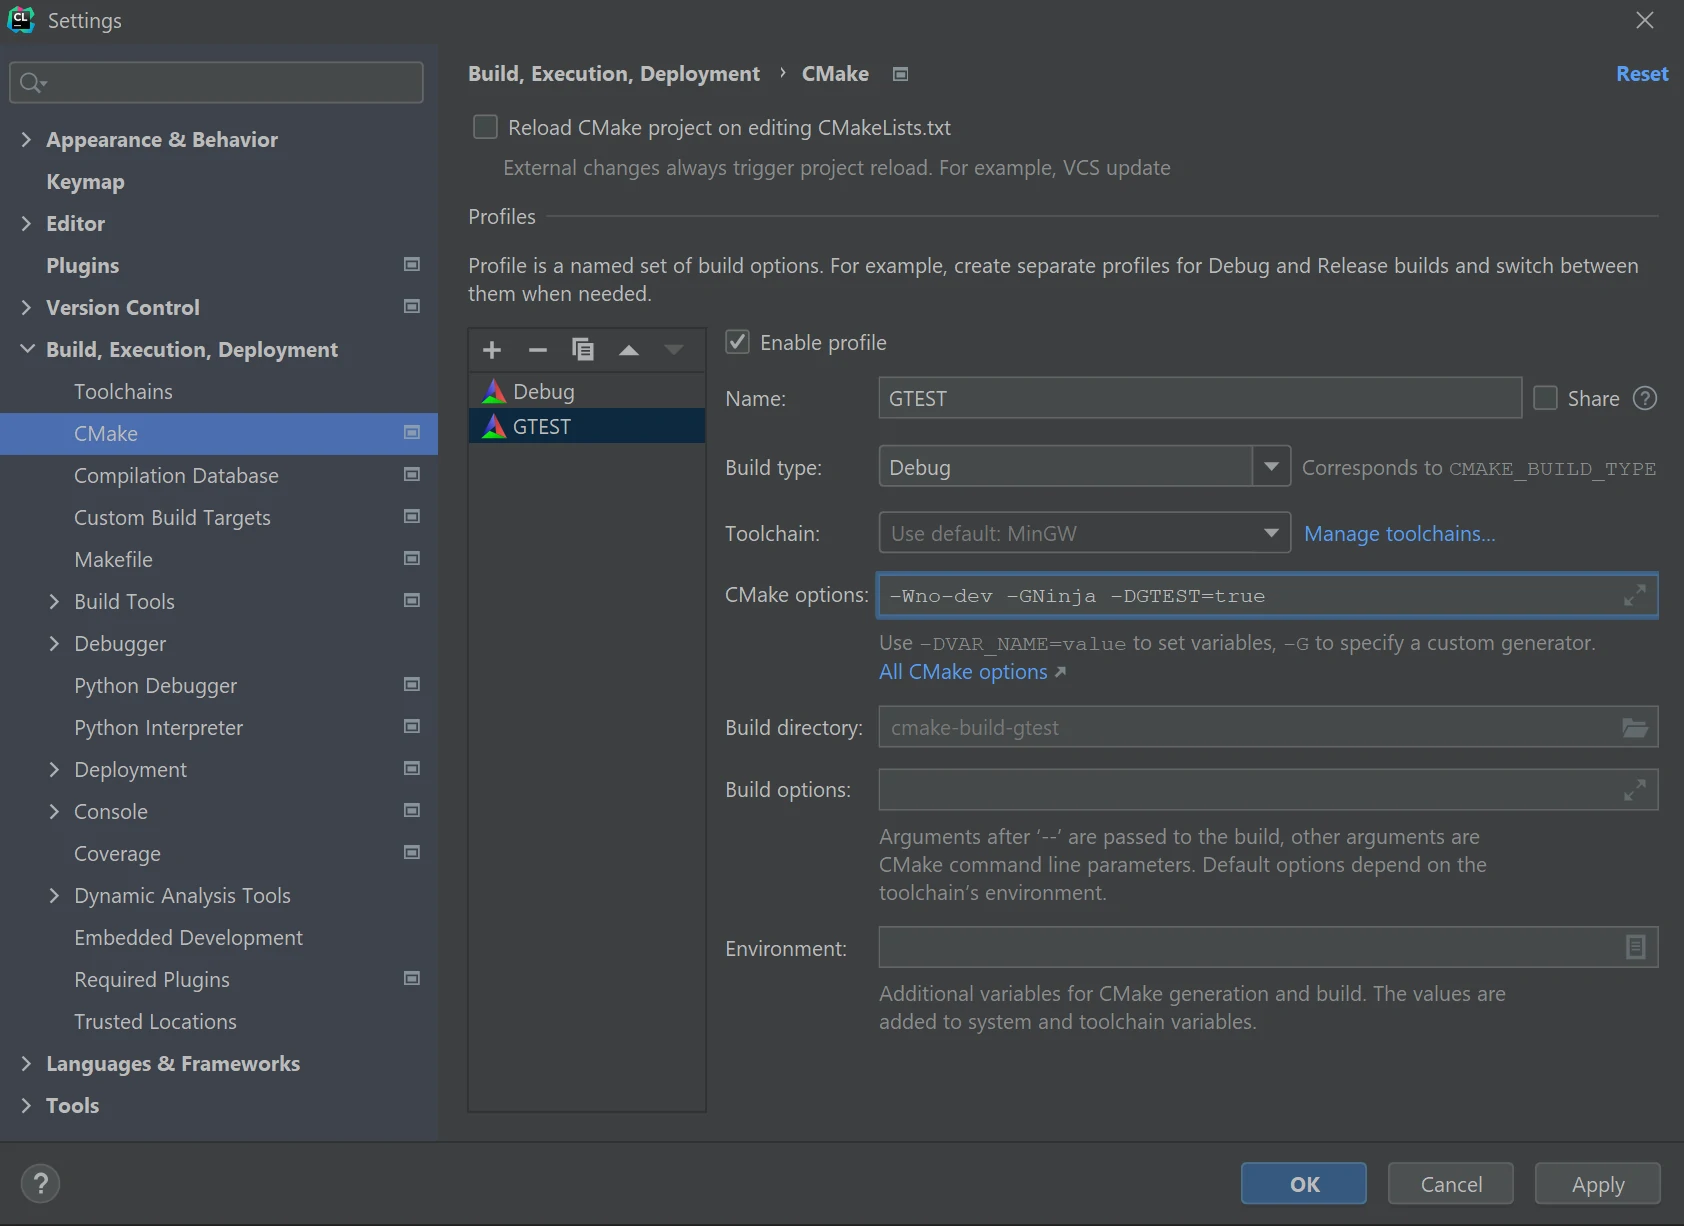
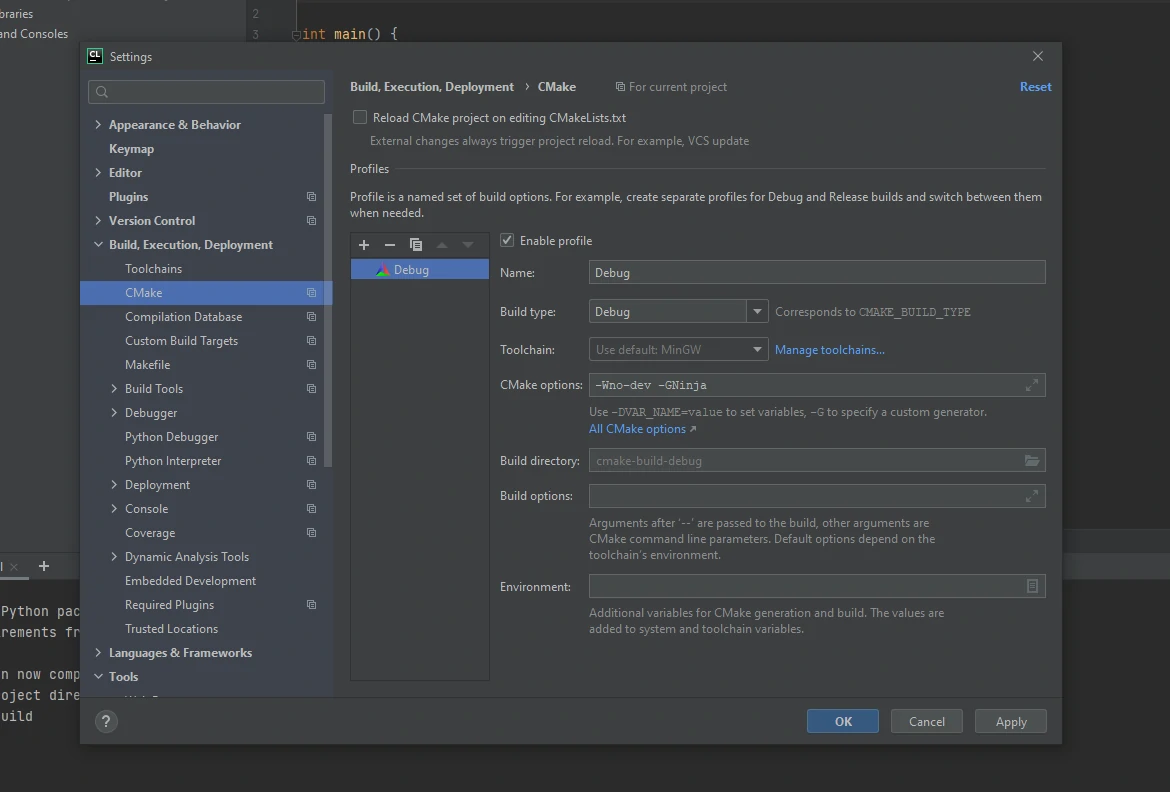
- Add
-Wno-dev -GNinjato the CMake optionsfile->settings->Build, Execution, Deployments->CMake- Wno-dev (W no-dev) suppresses a warning
- GNinja (G Ninja) Sets the Ninja option, I think this uses the Ninja tool that was downloaded earlier
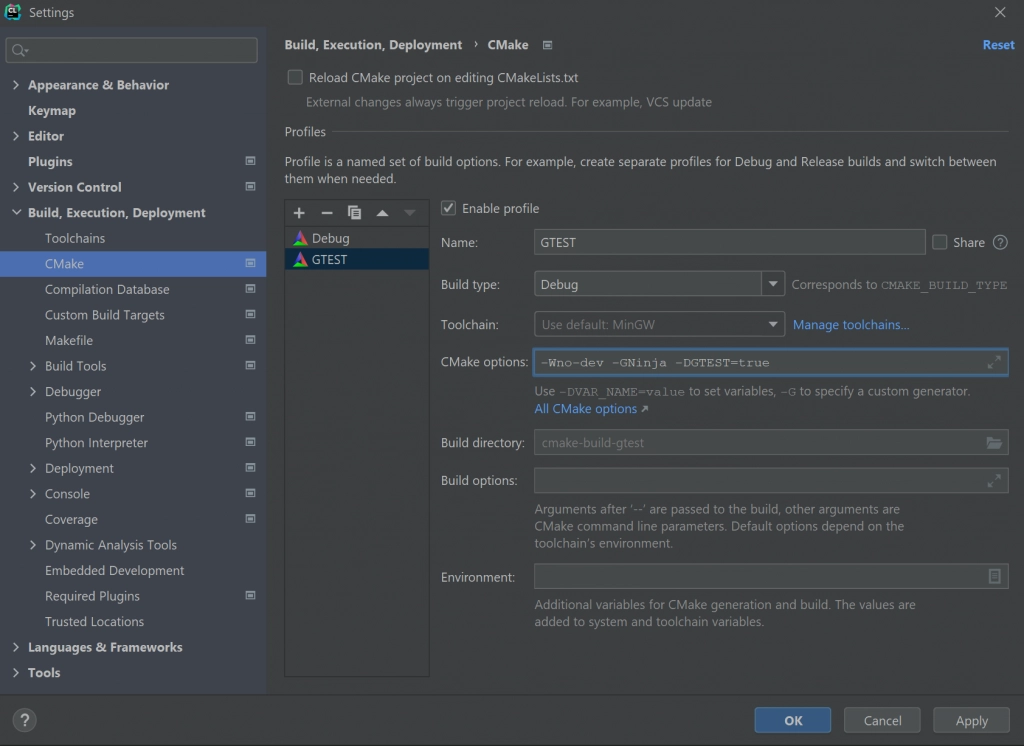
Create the googletest CMake build config
Settings->Build, Execution, Deployment -> CMake
-Wno-dev -GNinja -DGTEST=true
Run the test!
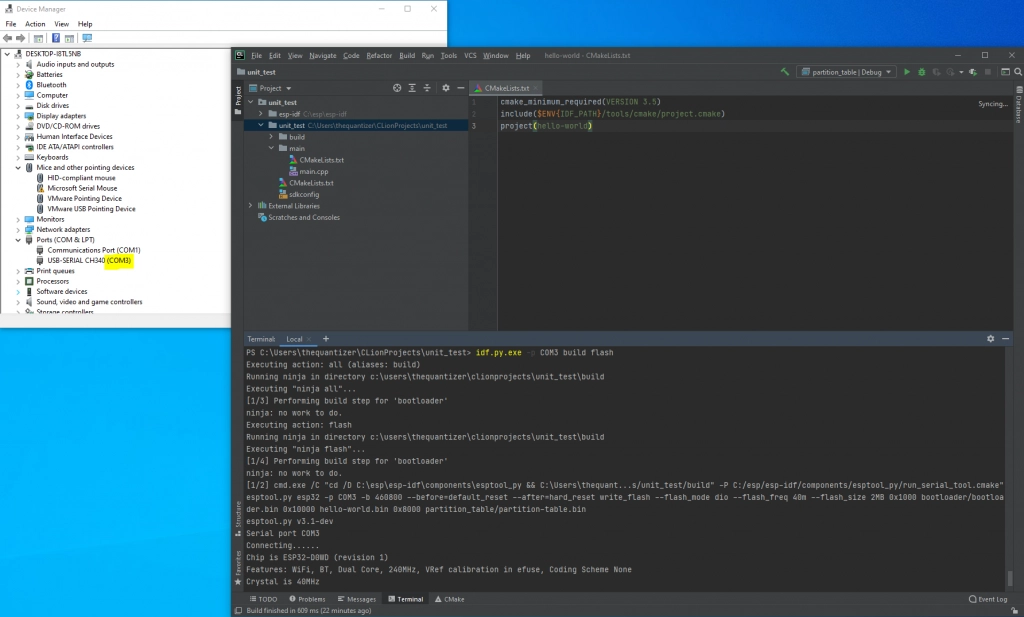
Flashing the ESP32
There are two ways we can build and flash the project
- The easiest way is to let the idf.py script do it for us
idf.py.exe -p COM3 build flashidf.py.exe -p COM3 monitor

- The other way is to invoke the CMake steps via CLion
- Build the app
- Build the bootloader
- Build the partition_table
- Flash with this command (Need to be in the cmake-build-debug directory)
python.exe C:\esp\esp-idf\components\esptool_py\esptool\esptool.py -p COM3 write_flash --flash_mode dio --flash_freq 40m --flash_size 2MB 0x10000 hello-world.bin- the arguments for the above command can be found in
cmake-build-gtest_esp32/flash_args
- Monitor with this command
python.exe C:\esp\esp-idf\tools\idf_monitor.py -p COM3 .\hello-world.elf
